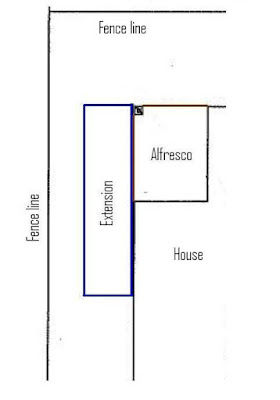
Well.. not really.. I thought it would be really cool if we can extend our deck from our Alfresco, on to the garden on the side of the house. That will give us a bigger area for entertaining. Here's a rough sketch of what I had in mind.
The hubby wasn't too excited about the idea at first but agreed to do it. Since none of us has built a deck before we didn't know where to start. Couple of trips Bunnings, hours of research on the internet reading homeone forum I managed to draw up a basic frame to determine the quantity of timber, stirrups and other bits and pieces.
So basically part of our deck is on concrete and the extension of the deck will be on posts in level with the concrete to make it appear as one floor area.
A deck built on the normal ground can be built on timber posts or metal stirrups. On top of the post/stirrup comes the bearers. Right angle to bearers comes joists and then the decking boards. Here's a basic plan I found on a website.
A deck built on concrete do not require any posts or stirrups. From the information I gathered the cross section of a bearer is normally 90mmx90mm and the cross section of a joist is 70mmx45mm. The thickness of a merbau decking board is 19mm. Since the step down from the house to the concreted Alfresco was only 80mm, we thought we'll have only the joists but side ways, with 10mm window packing underneath which brings up the height to be 55mm (45mm + 10mm). When the decking boards are added 55mm + 19mm = 74mm, there should be only 6mm step down which should be hardly noticeable (hopefully).
Once we had everything planned and sorted, we went to Bunnings and bought few things we are going to need to get started.
According to my calculations we need 24 posts to hold the extension of the deck, and each post needs to be concreted in. We bought 26 bags of concrete just to be safe.
We bought the metal stirrups for the extension. We went with stirrups. Why? we thought it will make the job easy also with timber posts there is a chance of timber rotting.
The bearers and the joists are treated pine so I bought this timber protective power (which needs to be de solved in water) called RE-TREAT, to apply on any exposed timber due to cutting or shaving. I was determined to do everything right ;)
The window packing and the dynabolts to bolt down the joists on to the concrete.
Finally the 70mmx45mmx4m joist. We bought the timber that was required only for the concreted area as I was a bit sceptical about buying everything at once (although the shop assistant in Bunnings told me to do so)
We marked where we want the joists to go. Drilled holes in the joists and the concrete. Glued the 10mm packing on to the joists and bolted the joists to the concrete using the dynabolts. Sounds simple doesn't it? It wasn't. But between me measuring the spacing of joist incorrectly and dynabolts getting stuck to the concrete, it wasn't as bad as I expected.
Alfresco area half done. Looks pretty cool so far!
It was getting dark but guess he couldn't stare at the bolts that were sticking out so he decided to shave them off with the grinder before ending the day.


No comments:
Post a Comment